Entrée
Hot Dirty Chiavetta’s Bird
Not a recipe today as much as a quick method for a moist, tasty chicken. This is Buffalo moving South.
If you eat BBQ chicken at the Erie County Fair or pick up BBQ chicken at the Volunteer Fire Department or Church sale in the Buffalo New York area, that chicken was marinated in Chiavetta’s BBQ Sauce. This Apple Cider Vinegar based marinade developed by Thomas and Eleanor Chiavetta is a Buffalo staple. Think Eastern North Carolina BBQ sauce without the red paper flakes and with a lot more herbs and spices. When we moved to Texas we cleared the shelves of every Wegman’s we could hit to stock up on this stuff.
My go-to chicken rub is Kosmos Q Hot Dirty Bird out of Oklahoma City. As Kosmos describes it a “fiery poultry rub built for smoked, grilled, and broiled birds.” It has salt, sugar, chili pepper, paprika, garlic, onion, plus. They “turned up the heat in (their) signature spicy blend to make this (their) most burning rub yet!”

Chiavetta’s BBQ Sauce and Kosmos Q Hot Dirty Bird; a marriage made in Heaven. GThe Chiavetta’s gives you a moist, favorable bird. The Hot Dirty Bird gives it a kick.

Short Rib and Mushroom Ravioli with Butternut Squash Pasta and Pinot-Sage Reduction
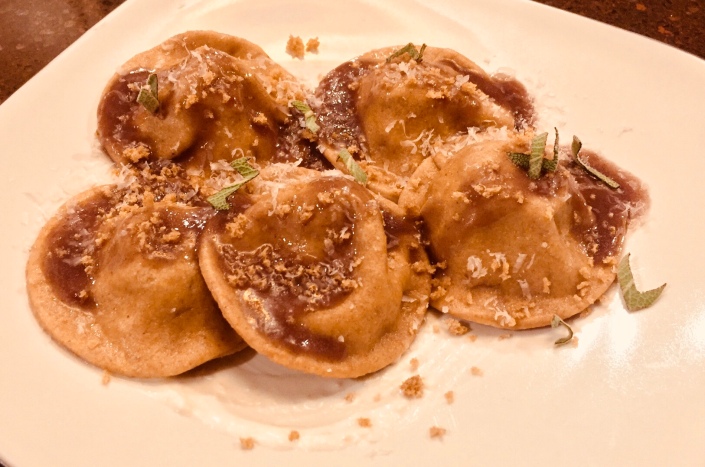
This recipe has been floating around in my brain for almost a year now. It’s genesis was an entree that my wife had at Biaggi’s Ristorante Italiano. Their butternut ravioli was regular ravioli with a butternut filling. I got me thinking of ravioli with a butternut pasta filled with something hardy. For hardy, you don’t have to look any farther than short-ribs and their beefy goodness meshes perfectly with mushrooms.
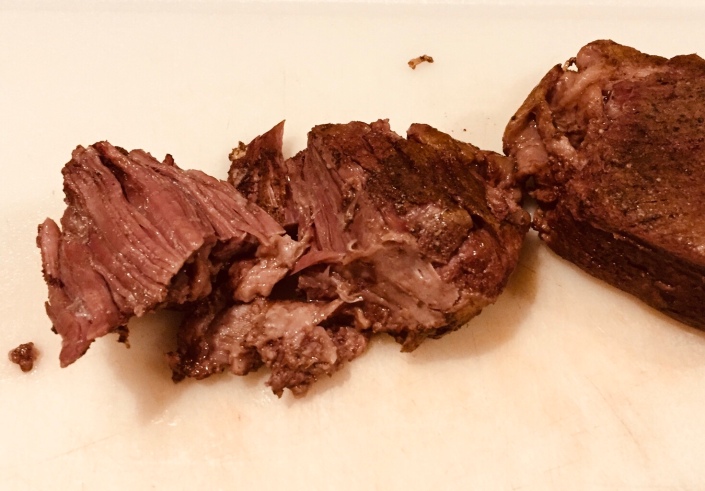
My short-ribs were cooked Sous Vide. Again, I’m not trying to turn this blog into a Sous Vide blog, but this methods of cooking is one of my favorites. I allows me to cook at a precise temperature for an optimal time and perfectly control the doneness and the texture of the meat. I cooked my short-ribs for 24 hours at 185° F. This is a higher temperature than I would normally cook short-ribs, but I was looking for the fat and collagen to totally render and the meat to fall apart into individual fascicles.
Feel free to use a crockpot or simply braise your short-ribs. You will get similar results. Since I had the bath going, I threw the mushrooms and squash into the pool to cook at 185° F., as well, for 1 and 2 hours, respectively.
I make my own pasta. My normal ratio of egg to flour is one large egg for every 100 grams of flour. In this case, I omitted one egg since I was adding the puréed squash and it adds moisture. I used Bob’s Red Mill whole wheat flour. It is a fine grind flour and I find it does not have the heaviness of many whole wheat flours. If using a courser ground whole wheat flour, you may want to mix it half and half with AP flour. I used my Kitchenaid pasta roller to make the Ravioli sheets and rolled it down to level 4. I topped one sheet with balls of the short-rib filling, topped that with a second sheet and cut the raviolis with a large biscuit cutter. if you have a ravioli cutter or press, all the better. If you are unfamiliar with making pasta, in general, or ravioli, in specific, there are numerous YouTube videos waiting to help. This was my first attempt at ravioli and they turned out well.
I used the juice from the short-ribs as the base for my sauce and topped it off with a dry Pinot Noir. Any good, dry red wine will work. You don’t need much sauce. Reduction is the key to intensifying flavor. The ravioli was plated with a smear of the horseradish/crème fraiche below the raviolis and sauce, Parmigiano-Reggiano, breadcrumps and sage above.
The below will make around 4 servings. This is a good fall or winter dish. Serve it with a side salad and a glass of the left-over Pinot Noir . . . better buy a second bottle to make sure you have enough.
Ingredients:
- 2 Boneless Short Ribs
- 1/2 cup small, fresh crimini mushrooms
- 2 tbsp balsamic vinegar
- 2 tbsp worcestershire sauce
- 1 tbsp olive oil
- 1 tbsp. butter
- 1 shallot, thinly sliced
- 3 cloves garlic, thinly sliced
- Juices from SV bags plus red wine to total 1 1/2 cups
- 4 sage leaves
- Salt and pepper, to taste
- For the Pasta:
- 10 oz. butternut squash, cube
- 300 grams whole wheat flour
- 2 large eggs
- For Plating:
- 2 Tbsp crème fraîche
- 2 Tbsp fresh horseradish
- Freshly grated Parmigiano-Reggiano
- Panko breadcrumbs
- Chiffonade of Sage
Directions:
- Prepare Sous Vide bath to 185° F.
- Salt and Pepper Short-Ribs and vacuum seal in a FoodSaver bag. Place in Sous Vide bath for 24 hours.
- Meanwhile, vacuum seal cubed butternut squash in a FoodSaver bag and add to Sous Vide bath for 2 hours of cooking. You can do this in advance of the final two hours in preparation for making the pasta.
- Vacuum seal mushrooms, vinegar and Worcestershire sauce in a FoodSaver bag and add to Sous Vide bath for the final hour of cooking.
- After the squash has cooked for 2 hours, remove the squash from the bath, unbag and puree in a blender or food processors adding water as necessary. Set aside to cool.
- Either manually or in a mixer, combine the flour, eggs, and pureed squash, adding water as necessary, and knead to create a smooth elastic dough. Create a ball, wrap in plastic wrap and set aside in the refrigerator for at least 30 minutes.
- After 24 hours, remove the short-ribs from the bath and remove from the bag to a cutting board to cool. Reserve the juices for the sauce.
- Remove the mushrooms from the bath, unbag and split in half. Chop one half finely and set aside for the ravioli filling. Slice the other half and set aside for the sauce.
- After the short-ribs have cooled, shred the meat and roughly chop.
- Mix the finely chopped mushrooms imto the chopped meat.
- In a small sauce pan over medium high heat, heat the olive oil and butter.
- Add the sliced mushrooms and cook for about 4-5 minutes,
- Add shallots to the pan and cook until they are becoming translucent, 3-4 minutes
- Add garlic and cook of 1 minute more
- Add SV bag juices, red wine and sage to the pan and reduce by 3/4s, 10-15 minutes. Strain out the mushrooms. shallots, garlic, and sage and season to taste.
- Start a large pan of water to boil over high heat.
- Meanwhile roll out the pasta dough. Place small balls of the short-rib/mushroom mixture on one layer of pasta spacing appropriately for your ravioli cutter. Brush water around the filling on the bottom layer of pasta and top with a second layer of pasta. Press pasta together around the filling and cut the raviolis.
- Cook the raviolis in the boiling water for 3 minutes or until done. Fresh pasta does not take long to cook.
- Mix an equal amount of crème fraîche and horseradish. Smear a small amount on each plate as a base for the raviolis.
- Place 3-5 raviolis on each plate, depending on the size of the raviolis.
- Top raviolis with cheese, breadcrumbs and reserved chiffonade of sage.
- Enjoy.
Asian Sticky Baby Back Ribs Sous Vide

I have been thinking about doing this recipe for a couple of months after having some Sweet and Sour Spare Ribs during my Asian cooking boot camp at the Culinary Institute of America. There are tons of recipes out on the web for Asian Sticky Ribs and, of course, none of them agree on how to do anything. That’s okay, because I only use them for inspiration. I always end up taking my own road.
I kept my ingredients simple since this was the first time making Asian Sticky Ribs. Next time, I may start it venture out a little. I used commercially available Chinese Five-spice. You can experiment with the flavor profile by actually using the base spices (star anise, Szechuan peppercorns, fennel, clove, and cinnamon) and varying the amounts.
Ribs need a low and slow cook to become tender. I chose to do the basic cooking Sous Vide since I can control time and temperature precisely. The other thing that nobody agrees on is time and temperature for ribs. The Sous Vide community seems to fall into two camps: The ~140F group and the ~165F group. The former tend to cook their ribs for 24-48 hours and the later for 4-12 hours. This is my first time with Baby Backs Sous Vide so I went with 160F for 12 hours in the dry rub and then finished them on the grill with the sticky sauce. You can chose your method, time and temp of cooking. The important point is having tender ribs that melt in your mouth and, of course, stick to your fingers.
I wanted to maximize the surface area for the sticky sauce so I cut the rack into individual ribs before coating the ribs. For ease of grilling, the two half-rack pieces can be left whole until ready to plate.
I served my ribs over a Spicy Asian slaw (recipe that I picked up at the CIA and tweaked) and Japanese Potato Salad (recipe in the May/June issue of Milk Street magazine). [As a side note, I run hot and cold on Cook’s Illustrated; however, I love Chris Kimball’s new effort. He has taken on international cuisine and it doing an excellent job of bringing it into the American kitchen. If you don’t already subscribe to the magazine and podcast, you are truly missing out on a fantastic culinary discussion. . . . Free advertisement complete.]
Wow, this is a keeper. The meat was moist and tender and easily pulls away from the bone leaving it totally clean. The sauce was not really sticky, but the flavor profile is definitely there. You can taste the anise, the soy sauce and Hoisin. The savory flavors of the ribs played well with the insane crunchiness and heat of the slaw and the cool, crunchiness of the potato salad. Every bit was an explosion of flavor and texture.
Ingredients:
- 1 rack of Baby Back Ribs
- Yellow Mustard
- Dry Rub:
- 1/4 cup Dark Brown Sugar
- 1 Tbsp Chinese Five-spice
- 1 Tbsp Kosher Salt
- Sticky Sauce:
- 1/3 cup Soy Sauce
- 1/3 cup Honey
- 1/4 cup Hoisin Sauce
- 2 Tbsp Rice Vinegar
- 3 tsp Chinese Five-spice
Directions:
- Prepare the Baby Back Ribs by removing the membrane from the back of the rack.
- Cut rack into two pieces for ease of Sous Vide bagging.
- In a small bowl, combine the Dry Rub ingredients and mix well.
- Slather ribs generously on both side with yellow mustard.
- Coat both sides of the ribs with the dry rub and rub to evenly coat.
- Place ribs into a the Sous Vide bags and vacuum seal.
 `
` - Refrigerate ribs for 8 hours or overnight.
- Prepare your Sous Vide cooking vessel and preheat water to 160F.
- Remove the ribs from the refrigerator and place into the Sous Vide bath for 12 hours.
- Near the end of the Sous Vide cooking time, combine the Sticky Sauce ingredients in a small bowl and mix well.

- At the end of 12 hours, remove the ribs from the Sous Vide bath, remove ribs from the bags and place on paper towels on a cutting board. Let ribs dry for 15 minutes.
- Meanwhile, fire up the grill for high heat cooking.
- When the ribs are somewhat dry, cut the rack into individual ribs and place in a large bowl.
- Pour the Sticky sauce into the bowl with the ribs and gently toss to thoroughly coat.

- Place the ribs on the grill and cook until the sauce has thickened and become sticky. Recoat the ribs with the left-over sauce until it is gone.
The Ollie Burger

And now for something a little different:
Anyone remember Lum’s Restaurant or Ollie’s Trolley? The only reason to go to Lum’s was the Ollie Burger created by Oliver G. Gleichenhaus and the recipe eventually sold to Lum’s. Only one Lum’s remains open, in Nebraska, and that Lum’s sadly has no Ollie Burger.
I have been on the search for a copycat Ollie Burger recipe for years and finally found what claims to be the original recipe (http://www.recipelink.com/msgbrd/board_14/2008/JAN/29430.html) and developed a method to use it to get the original flavor profile. The suggested method did not impart the marinade spices into the burger enough.
The change I made was to marinate 3/4 lbs of boneless Short Ribs and 3/4 lbs of Sirloin, each cut into 1 inch cubes, in the Ollie Burger marinade for 2 hours and then course ground it into ground beef. After forming 6 oz. burgers, I bagged them and cooked them sous vide for 45 minutes at 135F. Once out of the water bath, I let the burgers rest for 10 minutes, basted them with more marinade and seared them on a super hot grill for about 1 minute on each side topping the burgers with mozzarella after flipping. I then slathered a toasted multi-grain bun, not original, with Ollie’s Bun Sauce, plated the burger, and enjoyed. This is the Ollie Burger. I used one slice of mozzarella. Next time, I will use two.
No reason to fret if you have not yet explored Sous Vide cooking. The key here is marinating the meat in the Ollie Burger Sauce and grinding it into the ground beef.
Again not original, I served with a Japanese Potato Salad; recipe from this month’s Milk Street Magazine. The potato salad almost stole the show, but not quite. You need to get this recipe and try it. I was able to snag Kewpie mayo at my local Wegmans, but will have to try the work-around (extra egg yolk and sugar) when the wife is around since she is MSG sensitive.
Mississippi Short Ribs Sous Vide
The Mississippi Roast recipe is an internet sensation and a great way to add flavor and tenderness to a tough piece of meat. It’s simply made by throwing a chuck roast into a crockpot with one package each of Hidden Valley Ranch Salad Dressing and Au Jus Gravy Mix with some butter, pepperoncini and water and cooking for 6-8 hours. But we can’t do anything simply, can we? We need to complicate everything and take the road less traveled.
First, I don’t use salad dressing or gravy mixes. The top two ingredients in Hidden Valley Ranch Salad Dressing are salt and MSG. The top ingredient in McCormick Au Jus Mix is salt. No wonder Mississippi Roast tastes good: gobs of salt and glutamic acid. It’s an Umami Express. But I prefer to control my ingredients and minimize salt. In addition, my better-half is sensitive to MSG; so homemade buttermilk ranch dressing is on the prep list. You can, of course, substitute store-bought (shutter) ranch dressing for the homemade.

I was planning on making the dressing from homemade mayonnaise. That plan did not work out too well. I’m not sure why, but it would not emulsify. As a fall back, I used Hellman’s.
As far as the Au Jus mix, I don’t see the point. The meat has its own jus and we don’t need the added salt.
Okay, I admit I am a culinary snob, I don’t do “crockpot.” My slow cooker of choice is my Anova Precision Cooker (sous vide). Unlike the crockpot, with sous vide I can precisely control the doneness and texture of the meat. It’s all a matter of time and temperature. Variations are endless and predictable.
I have done a Mississippi Roast using this method with great results. Unfortunately, I lost my recipe to an iPad meltdown before I could post it. I thought I would start over and, as a twist, give it a try with Short Ribs. Short-ribs are another cut of meat that benefits from low, slow cooking and has a rich beefy taste. The recipe calls for bone-in Short Ribs. I actually used boneless since that is what was available.
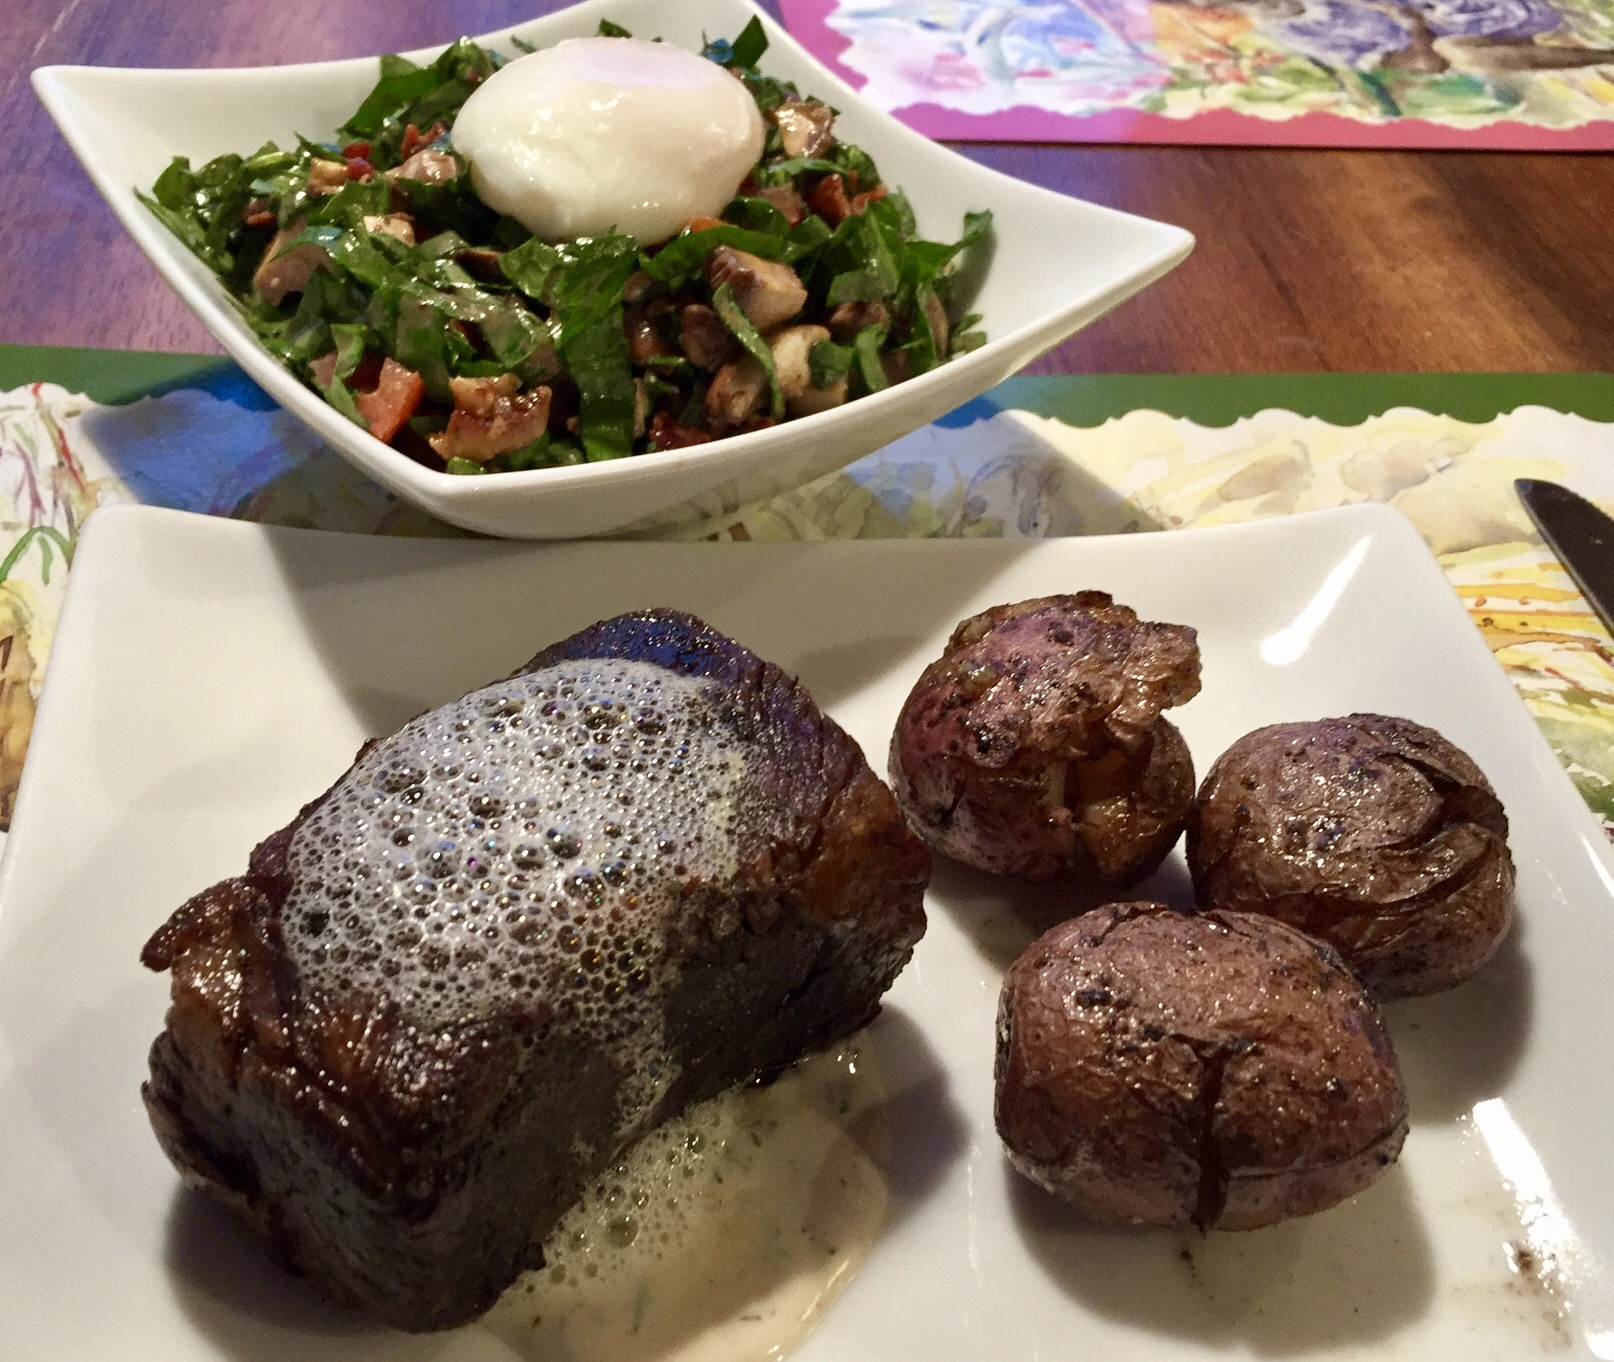
I was looking for a texture somewhere between a steak and the fascicles falling apart. I went with 165 F. / 74 C. for 24 hours. The texture and doneness were perfect. The meat was tender and flavorful without being stringy.

I am not sure if it adds much, but I did marinate the ribs in the ranch dressing and pepperoncini for 8 hours before throwing it into the cooker. Buttermilk has natural enzymes that tenderize meat. I figured it couldn’t hurt to let the short-ribs get happy in the dressing before starting the cooking process. If I were to change anything, it would be to pierce the pepperoncini before adding them to the bag. Even after 24 hours of cooking, many of them were whole with the juices still captured inside instead of flavoring the meat.
I have also been experimenting with molecular gastronomy, so for plating I topped it with some pepperoncini air. This step is totally optional. I served it with my take on Spinach Salad ala Firebirds Wood Fired Grill and some Bourbon Cracked Potatoes (recipe coming later).
Ingredients:
- 3 Bone-in Short-Ribs, 1 1/2 to 2 pounds, English or Hybrid cut
- 3/4 cups Homemade Buttermilk Ranch Dressing (see below)
- 12 Pepperoncini
- Salt and freshly ground black pepper
- 2 tbps Olive Oil
Directions:
- Place the short ribs in vacuum bag(s) leaving room between ribs with 1/4 cup of ranch dressing and 4 pepperoncini per rib. Vacuum seal each bag.
- Marinate in refrigerator for 8 hours.
- Preheat water bath to 165F/74C
- Place short ribs into the water bath and cook for 24 hrs.
- Remove bags from the water bag, remove ribs from the bags and pat dry with paper towels and season with salt and pepper.
- In a skillet, heat oil over high heat. Sear short ribs on all sides.
- Serve on smear of Ranch Dressing. Top with Pepperoncini air.
Homemade Buttermilk Ranch Dressing
- 1/2 cup mayonnaise
- 1/4 cup buttermilk
- Juice of 1/2 lime
- 1 tsp red wine vinegar
- 1 tsp Worcestershire sauce
- 1 tsp garlic powder
- A dash of cayenne pepper
- 1 tbsp chopped fresh dill
- 1 tbsp chopped fresh chives
- Salt and Pepper, to taste
Combine all ingredients in a small bowl. Mix well. Cover and chill in refrigerator overnight.
Pepperoncini Air
- 20 grams Pepperoncini
- 25 grams juice from Pepperoncini
- 100 grams water
- 1 gram Soy Lecithin
Moroccan Chicken With Olives

The genesis of this recipe was Moroccan Chicken Smothered In Olives from the New York Times. The basic ideas of the recipe seemed sound, but the suggested execution lacking. I did not brine my chicken. Maybe it would have been better, but my version was moist and flavorful without the additional step. I also did not just throw the ingredients into a casserole and braise it. I took a more classic approach and seared my chicken and cooked down my onions and garlic. I also started on the stove top, cooked in the oven and finished back on the stove top, as I often do.
Many of the reviews of the original recipe complained about a bland sauce. I can’t imagine how they achieved that result unless they opted not to reduce the sauce at the end and failed to adjust their seasoning. I used only half of the spices from the original recipe since it just seemed like too much and I had great flavors. I also did not blanch my olives as recommended which undoubtedly helped add flavor. Why would one want to extract the briny taste of the olives? I also added salt and pepper up front and at the end. I seasoned my meat before I seared it and adjusted the seasoning when reducing the sauce.
The original recipe was undoubtedly a little lower in calories and lower in sodium, but according to reviews lacked flavor. Give me a few more calories and better taste any day. I would gladly spend a few extra minutes in the gym than sacrifice flavor in my food.
I betrayed a basic principles here: try a recipe as written at least once and then adjust from there. I often abandoned this rule, but this one begged for upfront revision. A lack of seasoning and making sauce reduction optional just begged for substandard results.
Ingredients:
- 8 skinless, boneless chicken thighs
- Salt and pepper
- 2 tablespoons olive oil
- 2 onions, peeled, halved and sliced
- 1 teaspoon ground ginger
- 1 teaspoons ground turmeric
- 1 teaspoons ground cumin
- 1/2 tablespoon Spanish sweet paprika
- 4 cloves garlic, peeled and chopped
- 2 cups low-sodium chicken broth
- 11 ounces pitted green olives in brine, drained and halved
- Juice of 1 lime
- Salt and pepper, to taste
Preparation:
- Preheat oven to 350 degrees F.
- Salt and pepper both sides of chicken pieces.
- In bottom of a large pan, heat oil over medium-high heat.
- Add chicken pieces and brown on all sides.
- Remove chicken to a plate.
- Add onions and sauté until softened and translucent.
- Add chicken back to pan.
- Add chicken broth. Sprinkle with ginger, turmeric, cumin, paprika, and garlic. Place over high heat to bring to a boil.
- Cover and move to oven for 30 minutes, turning chicken once.
- Turn chicken again and add olives and lime juice to chicken, and cook uncovered for another 10 minutes.
- Remove chicken to a platter and keep warm.
- Transfer pan to the stove-top and raise temperature to an aggressive simmer to reduce adding salt and pepper to taste. Thicken sauce to 1/4th or less in the volume.
- Pour sauce over chicken and serve hot.
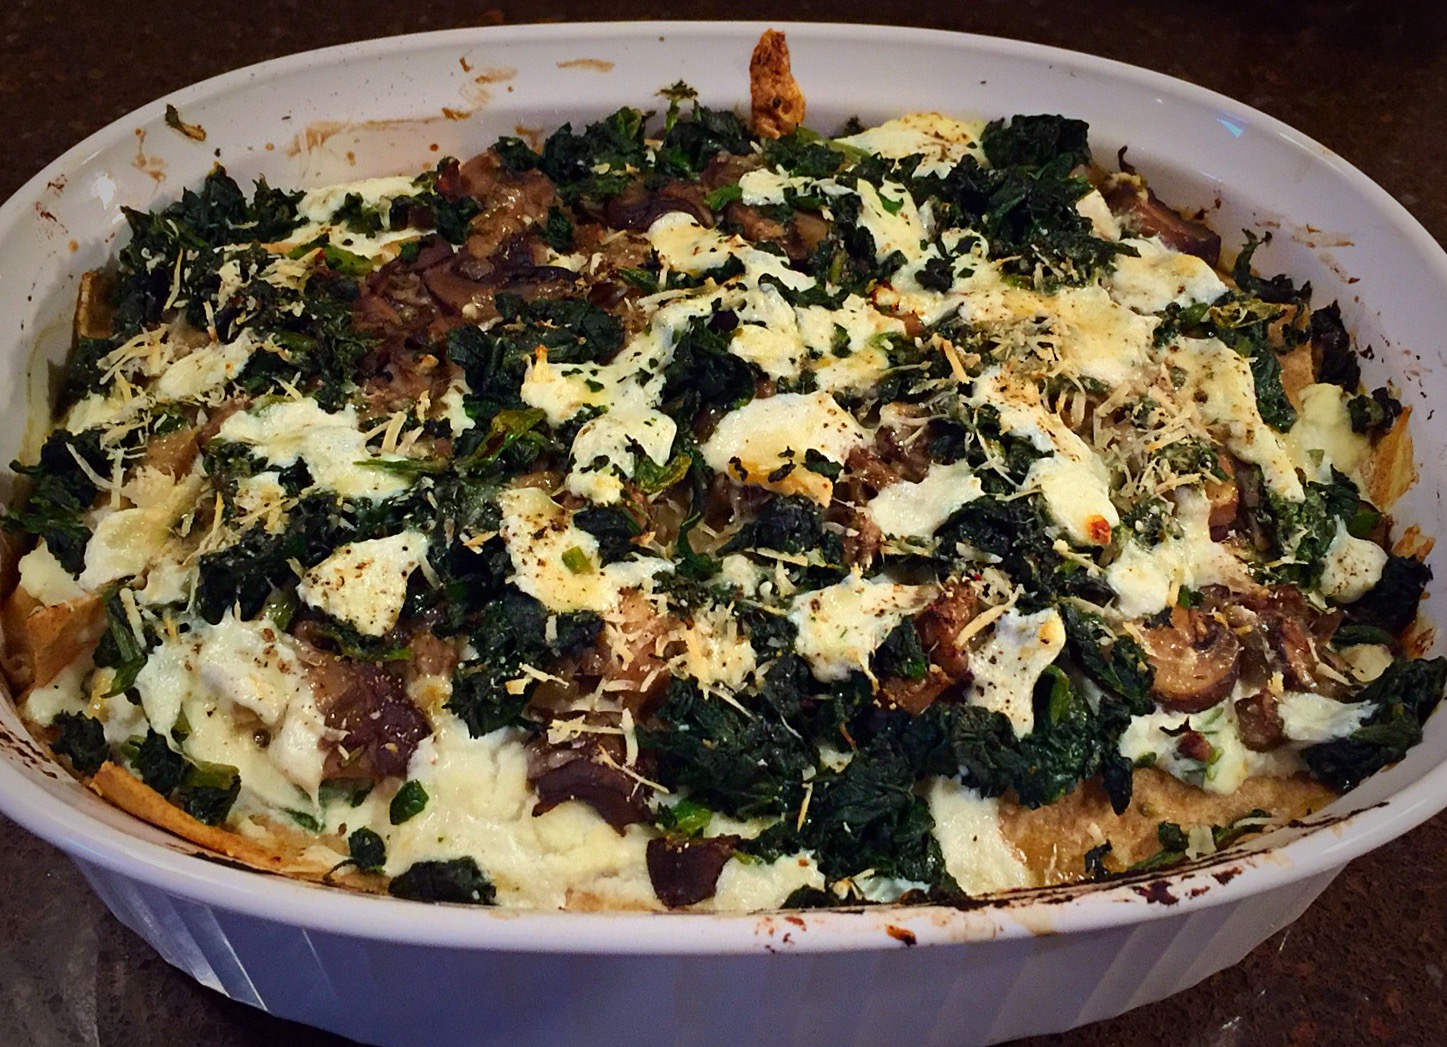
Mushroom and Spinach Lasagna
This adventure started with a Mushroom and Burrata Lasagnette recipe by Alison Roman published in the October 2015 issue of Bon Appetit. Ms. Roman admits her recipe is “indulgent” and, I am sure, delicious, but what I was going for is something much lower in fat and healthier. I not only want to “live a little,” but live a little longer.
Gone is the butter and olive oil. Gone is the heavy cream. In place of the heavy cream, I used a cauliflower cream (basically pureed cauliflower). If you don’t want to go to the trouble of making the cauliflower cream, substitute back in 1/4 cup of heavy cream. In place of the burrata, I used mozzarella. I am sure the extra creaminess of the burrata adds to the decadence, but would get lost in the lasagnette. For added nutrition, I added spinach to the recipe.
The other major change is the serving size. As published, the recipe indulgently serves 2 people. I used a little larger casserole dish and it yielded 6 large servings.
You can use dried lasagna noodles. Simply cook them until al dente according to package instructions before assembling the lasagna. I have sworn off store-bought pasta in favor of homemade. It’s really not that difficult to make and the taste and texture is far superior its store-bought relative. I used Bob’s Red Mill 100% stone ground whole wheat organic flour for the pasta. Bob’s Red Mill flour is ground finely enough to give you light, delicate pasta even using 100% whole wheat.
Ingredients:
2 pounds mixed mushrooms, cut into bite-size pieces
Salt and freshly ground pepper
1 large shallot, finely chopped
1/2 cup dry white wine
1/2 Tbsp fresh rosemary, finely chopped
1 cup fat-free ricotta
1/4 cup cauliflower cream
1/4 fresh nutmeg, grated
2 tsp. fresh thyme
14 oz frozen cut leaf spinach, thawed and squeezed dry
12 fresh lasagna noodles (about 10 x 4 inches)
8 ounces fresh mozzarella, torn into pieces
1 1/2 ounces Parmesan, finely grated
Directions:
1) Preheat oven to 425°.
2) Add mushrooms to a large skillet over medium-high heat. Season with salt and pepper and cook, stirring occasionally, until liquid has been absorbed, about 10-15 minutes.
3) Add shallot, wine and rosemary and again cook, stirring occasionally, until liquid has been absorbed, about 5-10 minutes.
4) Combine ricotta, cauliflower cream, nutmeg and thyme in a small bowl; season with salt and pepper.
5) Working in batches, cook fresh lasagna noodles in a large pot of boiling salted water, stirring occasionally, until just softened, about 30 seconds.
6) Spread a thin layer of ricotta mixture in a 10 x 8 x 3 casserole dish and top with a 2 lasagna noodles side by side. Spread a large spoonful of ricotta mixture over pasta, layer with 1/6 of the mushrooms, spinach and mozzarella. Top evenly with 1/6 of the Parmesan. Repeat layering process 5 more times finishing with the last of the Parmesan and grinding on fresh pepper, to taste.
7) Cover casserole with foil and bake until warmed through, about 15-20 minutes. Remove foil and continue baking until golden brown, 20-25 minutes.
8) Let cool at least 5 minutes and serve.
Chicken Tagine with Apricots, Raisins and Dates

I have been on a Mediterranean kick lately. Not only is the food healthy, but they have some intriguing flavor combinations. When exploring Mediterranean cooking, Moroccan food is mandatory. I fell in love with Moroccan food years ago at Epcot in Disney World. I know an “international experience” at Epcot is rather lame, but at the time Epcot did grant exposure to the world to rather insular Americans which I was at the time.
Moroccan cooking uses typical spices of the region: cumin, coriander, cinnamon, allspice, saffron, and nutmeg. They also use fruits in their cooking which seems somewhat unique. For this recipe, I was looking for the right savory spice profile balanced with some sweetness from the fruit. I was looking for the balance to tip more to the savory than sweet.
A tagine is a Moroccan dish named after the traditional earthenware pot in which it is traditionally cooked. So I guess this recipe is not really a “Chicken Tagine”. It is a “Chicken Dutch Oven.” I don’t have a traditional earthenware tagine, but can use the traditional ingredients and spices and find an appropriate, if not traditional, vessel in which to cook them.
I used whole spices, toasted and ground them. You could use store-bought ground spices. As long as they are fresh, the flavor profile should be okay.
I have a niece that is allergic to apricots. Other dried fruits can be substituted. I would stay away from overly sweet fruits. Dried papaya, mango, or pear would be interesting. Dried strawberries would be a different twist, but I would probably crank back on the orange juice. I wanted to add some pomegranates, but, sadly, couldn’t find any.
Concerning dried fruits, I have discovered that most are heavy in chemical preservatives. I tend toward their organic cousins that have nothing but fruit. Without fail, if my wife has a head-ache, I can trace it to a food label I did not read closely enough the prior day. You could read that as, if my wife has a head-ache, it’s probably my fault. But then again, that’s a given.
This meal was great on the first night and even better as leftovers the second as the spices intensified.
I served the tagine over whole wheat Israeli Couscous with some whole wheat garlic Naan. Yes, I know Israeli Couscous and Naan are not Moroccan, buy it made for a delicious meal.
Ingredients:
1 Tbsp Olive Oil
4 Chicken Legs, separated into Thighs and Drumsticks
1 Onion, chopped
1 Small Hot Pepper, minced
1 cup Dried Apricots, roughly chopped
3/4 cup Fresh Dates, pitted and roughly chopped
3/4 cup Raisins
2 Tsp whole Cumin seeds
2 Tsp whole Coriander seeds
3 inch stick of Cinnamon
2 pinches of Saffron
10 Allspice Seeds
1 Tsp freshly grated Nutmeg
3 Cups Apple Cider
3 Cups Water
Juice of 1 Orange
Salt and Pepper, to taste
Direction:
1) Heat Olive Oil in a Dutch Oven over medium-high heat.
2) Salt and Pepper chicken and place in the Dutch Oven. Brown on all sides, approximately 10 minutes.
3) Meanwhile, toast spices in a hot, dry skillet until fragrant and lightly browned. Remove spices to a mortar and grind with a pestle or pop into your handy, dandy spice grinder. Pre-ground spices are acceptable, but fresh ground are better.
4) When browned, remove chicken from Dutch Oven and reserve. Add onion and peppers and sauté until soft, about 5 minutes.
5) Add ground spices to the onions and peppers and cook for an additional minute.
6) Return chicken to the Dutch Oven. Add fruit, orange juice and enough half-cider, half-water mixture to cover. Increase heat to a boil and the reduce to a simmer. Cook for 45 minutes. If more liquid is needed during cooking, add cider and water in equal proportions.
7) Remove chicken to a plate and cover to keep warm.
8) Increase heat on Dutch Oven to a boil and reduce broth for 10 minutes.
9) Serve chicken plated over couscous and top with the reduced broth.
Beef and Spinach Börek

There are plenty of recipes for beef börek and plenty for spinach börek, but not so much for beef and spinach borek. So that is the recipe du jour. Okay, let’s backtrack a little. What in the world is a börek?
According to the fount of all knowledge and wisdom, Wikipedia, “Börek … is a family of baked or fried filled pastries made of a thin flaky dough known as phyllo (or yufka). … It was most probably invented in what is now Modern Turkey.” Yes, börek is Turkish, but it has spread. There is Serbian börek and Bulkan börek. There are African and Israeli variations. There are börek, bureks and briks. They are made as pies, spirals, cigar shaped cylinders, triangular or crescent bit size pieces and tarts. What is their essence? A thin flaky crust and some filling. I can work with that!
Back to beef böreks and spinach böreks, my recipe is the best of both worlds; a beef and spinach börek with authentic Mediterranean spices. I used non-fat Feta which is common in spinach böreks, but not beef variations. I also added non-fat Greek yogurt to the egg wash instead of the milk which is more common in beef böreks. I used fresh spinach, but you could use its frozen cousin, thaw it and squeeze out all the liquid.
I developed my own blend of Turkish spices for this recipe and have added the recipe below. For this one, I chose the spiral form since it looks cooler. Doing a simple pie would be easier, but the spiral was much more elegant with little extra effort.

With endless varieties, you can play with this recipe for many delicious meals to come. I served it with a side salad for a simple, delicious and healthy meal.
Ingredients:
2 Tbsp. Olive Oil
1 lb. Ground Beef
1 Medium Yellow Onion, chopped
3 Cloves Garlic, minced
2 cups fresh Spinach, finely chopped
1/2 cup Non-fat Feta Cheese, crumbled
3 tsp. Turkish Spice Blend (see below)
Salt and Pepper, to taste
1/2 cup Non-fat Greek Yogurt
2 Large Eggs
1 tsp. Ground Cumin
10 sheets of Phyllo dough
Poppy Seeds
Directions:
1) Pre-heat oven to 350 degrees F.
2) In a large skillet, heat 1 tablespoon of Olive oil over medium-high heat. Add ground beef and brown until thoroughly cooked.
3) Remove ground beef to a large mixing bowl leaving and liquid in the skillet.
4) Add onions to the skillet and cook until translucent, about 5 minutes.
5) Add garlic to skillet and cook for an additional 1-2 minutes.
6) Strain onions and garlic an add to the mixing bowl with the ground beef.
7) Add the spinach, feta cheese, Turkish spice blend, salt and pepper to the beef mixture and mix thoroughly. Set aside to cool.
8) In a separate mixing bowl, combine 1 tablespoon of Olive oil, the Greek yogurt, eggs and cumin. Whisk until smooth.
9) On a clean dry surface, lay out one layer of phyllo. Brush lightly with the yogurt-egg mixture, top with another layer of phyllo and brush it with the yogurt-egg mixture, as well.
10) Use 1 cup of the ground beef mixture and spread along the long edge of the phyllo to within one inch of each side.
11) Fold the sides over the filling and roll the phyllo into a long cylinder. Roll the cylinder into a spiral and place on a lightly greased sheet pan. Repeat until the ground beef mixture is gone. It should make 5 spirals.
12) Brush the tops of each spiral with the yogurt-egg mixture. Sprinkle with poppy seeds.
13) Bake for 40 minutes until golden brown. Let rest for 5 minutes before serving.
Turkish Spice Blend:
Ingredients:
1 tsp. Whole Cumin Seeds
1/2 tsp. Whole Coriander Seeds
2 inch Cinnamon Stick
1/2 tsp. Whole Cloves
1/2 tsp. Whole Allspice
1/2 tsp. Ground Nutmeg
Directions:
1) In a hot, dry sauce pan, toast all spices except for the nutmeg until fragrant and the cumin is just starting to brown.
2) Place toasted spices into a mortar and pestle.
3) Grate nutmeg into the spice mix.
4) Grind the spices into a fine powder.
Mushroom Soup

The weather has been frigid lately and that demands soup to warm the bones. I had never done a mushroom soup so I decided to give it a go. I used a variety of mushrooms: 1/2 Crimini, 1/4 Shitake and 1/4 rehydrated Porcini. If using dried mushrooms, do not throw away the rehydration liquid. Strain it carefully and use it in place of some of the stock. In my case, I had 1 cup of rehydration liquid and 3 cups of broth. There is no sense in throwing away all that flavor.
I used a semi-dry sherry since the subtle, oaky flavors would go better with the earthiness of the mushrooms than a dry, fruity sherry. The Greek yogurt added some thickening and richness without the fat of regular or sour cream.
It’s not Campbell’s Cream of Mushroom (that is a good thing), but it was Mm, Mm, Good! I served it along side a pork loin roast stuffed with spinach, mushrooms and shallots, but it really could be a meal all by itself.
Ingredients:
1 Tbs. unsalted butter
1 Tbs. olive oil
3 medium shallots, diced
4 cloves garlic, minced
1 lb. fresh wild mushrooms, cleaned, trimmed and thinly sliced
2 Tbs. fresh Rosemary
4 cups homemade chicken broth
1/4 cup non-fat Greek Yogurt
1/4 cup semi-dry sherry
Salt and pepper, to taste
Directions:
1) Melt the butter and olive oil in a large Dutch oven over medium-high heat. Add the shallots and cook until translucent, about 5 minutes.
2) Stir in the garlic and cook for 1 minute.
3) Reserve several slices of mushroom for the garnish and add the rest of the mushrooms and rosemary to the pot and cook until the mushrooms are soft, about 5 minutes.
4) Add the broth, deglaze the pan and bring to a boil over high heat. Reduce the heat to a simmer and cook for 15 minutes.

5) Remove from the heat and let cool slightly.
6) Transfer about half of the soup to a food processor and puree until smooth.
7) Return the mixture to the pot and stir in the Greek yogurt and sherry. Salt and pepper, to taste, and reheat.
8) Garnish each serving with a couple of slices of reserved mushrooms.
